

How to Roast Coffee Beans at Home to Enjoy Fresh Flavor
Brewing a great cup of coffee starts long before water touches the beans. The real magic begins with roasting and learning how to roast coffee beans at home. This sight can change the way you enjoy your daily drink.
Roasting at home gives you the power to control flavor. You decide if you want a light taste or a bold one. No shop can match the freshness of beans roasted in your own kitchen.
This guide keeps things simple and clear. You will learn the steps, tools, and tricks beginners need. Soon, you’ll be roasting beans with confidence and excitement.
Do I Need A Roaster to Roast Coffee At Home?
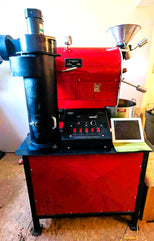
Many people wonder if they need a special roaster to roast coffee beans at home. The truth is, using a coffee roaster is the best way to roast coffee no matter at home or in your store. A roaster is made for this job and gives you better control over heat and time.
For new users, there are small home roasters that are easy to use. They are safe, clean, and help you get even roasting. With a little practice, you can learn how to roast coffee beans. You can use home roasters from popular brands like Probat, Ikawa, and Mill City to enjoy consistent results.
To use a roaster, you set the time and temperature. Then watch as the beans change color and smell. When they reach the level you need, you should stop the process and cool them.
Still, you don’t always need a roaster. Some people roast beans in a pan, an oven, or even with a popcorn maker. These methods work but need more care and additional attention.
Preparing Beans Before Roasting Coffee at Home
Before you begin roasting, you need to prepare your coffee beans. The beans you roast at home are called green coffee beans. They are raw, hard, and have no smell like roasted coffee. Preparing them the right way helps you get better flavor later.
Coffee Bean Pre-Roasting Tasks:
- Select Quality Beans
- Measure Accurately
- Remove Impurities
- Ensure Dryness

Here are a few simple steps to follow:
- Choose the right beans: Always buy fresh green coffee beans. Look for beans that are clean, even in size, and free from damage. Good beans make roasting easier and the taste better.
- Measure the amount: Decide how much you want to roast. It’s better to start with a small batch, around one cup of beans. Small amounts are easier to manage and give you more control.
- Check for dirt or stones: Sometimes green beans may have tiny stones or husks mixed in. Remove them before roasting. It keeps your equipment safe and your coffee pure.
- Keep beans dry: Make sure your beans are stored in a dry place before roasting. Wet or damp beans won’t roast evenly and may spoil the taste.
How to Roast Coffee Beans at Home: 4 Different Methods
Not everyone owns a roasting machine, but that doesn’t stop you from enjoying fresh beans. You can still roast coffee beans at home without a coffee roaster, using everyday kitchen tools. These methods are simple, practical, and give you a real taste of the process.
Comparison of Home Roasting Methods Without a Roaster:
| Method | Batch Size | Control Over Roast | Best For |
|---|---|---|---|
| Cast-iron skillet / Stovetop | Small | Medium | Beginners who like hands-on roasting |
| Oven Roasting | Medium | Low | People roasting larger amounts |
| Air Fryer Roasting | Small - Medium | Medium - High | Easy roasting with even heat |
| Popcorn Popper Method | Small | Medium | Quick and fun roasting experiments |
Each method has its own strengths. Some give you better control, while others make it easier to roast more beans at once. Let’s go through them in detail so you can pick the best way to roast coffee beans at home without a dedicated roaster.
Method 1: Cast-Iron Skillet / Stovetop Roasting
Pan roasting is one of the oldest methods of roasting coffee. Among different types of pans, a cast-iron skillet works best for roasting as it holds heat well and spreads it evenly. It requires attention, but it gives you full control of the roast.

Step 1: Heat the Skillet
Place your cast-iron skillet on the stovetop and set it to medium heat. Let it preheat for at least five minutes. A properly heated skillet ensures beans roast evenly from the start.
Step 2: Add the Green Coffee Beans
Pour about one cup of green beans into the skillet. Don’t overload it. Smaller batches let you manage the roast better and avoid uneven results.
Step 3: Stir Constantly
You can use a wooden spoon or spatula to stir the beans without stopping. This prevents them from burning and helps each bean reach the same roast level. Stovetop roasting requires your focus, but it teaches you how beans react to heat.
Step 4: Watch and Listen for Coffee Roasting Stages
First, the beans turn yellow and release a grassy smell. Then comes the first crack, which sounds like popcorn popping. It means you’ve reached a light roast. Keep going if you want a medium roast.
A little later, you’ll hear the second crack, which is a sharper and quicker pop. That’s a darker roast. Stop roasting when the beans look and smell how you want.
Step 5: Cool the Beans in a Metal Colander
Quick cooling is important. You should pour the hot beans into a metal colander and stir them to let air pass through. You can even use two colanders and pass beans back and forth. This cooling therapy locks the roast level and prevents bitterness.
Method 2: Oven Roasting
Oven roasting lets you roast a larger amount of beans in one batch. It’s simple but gives less control compared to the stovetop. You will need an oven set to 450 to 500°F (215°C), a baking sheet, and some aluminum foil.

Step 1: Preheat the Oven
Set your oven temperature between 450 to 500°F (215°C). This high heat is needed to push beans through the roasting stages.
Step 2: Prepare the Baking Sheet
Line your baking sheet with aluminum foil for easier cleanup. You should spread the beans in a single layer so hot air can reach each bean. Piling them up will cause uneven roasting.
Step 3: Start Roasting
Place the tray on the middle rack of your oven. Then keep the oven door slightly open to release smoke, as beans produce a lot of it while roasting. Try to stir the beans with a spatula every 4 to 5 minutes so they roast evenly.
Step 4: Track the Coffee Roasting Stages
After 8 to 10 minutes, you’ll hear the first crack. It is your light roast point. Continue roasting if you want medium or dark. The second crack means a bold and smoky roast. You should use both the sound and the bean color to decide when to stop.
Step 5: Cool on a Baking Tray or Metal Colander
Remove the tray and transfer beans onto another baking tray or into a colander. You should stir them until they are cool. This cooling process stops further roasting and protects flavor.
Method 3: Roast Coffee Beans at Home Air Fryer
If you want an easy and less messy method, you should try to roast coffee beans at home air fryer style. Many coffee lovers say it’s the best way to roast coffee beans at home because it’s fast, even, and simple.

Step 1: Preheat the Air Fryer
Set your air fryer to about 400°F (200°C) and let it heat up for 2 to 3 minutes. A hot fryer basket gives you an even start.
Step 2: Add the Beans to Basket
Pour a small amount of green beans into the basket. Overloading will block air circulation, and some beans may roast unevenly.
Step 3: Roast and Shake
Start the roast and pause every few minutes to shake the basket. It ensures beans move around and roast evenly on all sides.
Step 4: Notice Coffee Roasting Stages
Watch closely as the beans change from green to yellow, then to brown. When you hear the first crack, you have a light roast. You should wait longer for medium or dark, and listen for the second crack.
Step 5: Cool Quickly in a Metal Colander
Once beans reach your desired stage, you can pour them out into a colander. You should stir or shake until cool. This simple step makes a huge difference in flavor.
Method 4: Popcorn Popper Method
Another fun option is the popcorn popper method. Many people try this because hot-air popcorn machines can roast small batches very quickly.

- Step 1: Turn on the popcorn popper and let it warm up for a minute.
- Step 2: Pour in a small amount of green beans. Too many at once may block airflow and cause uneven roasting.
- Step 3: The hot air will swirl the beans around, much like popcorn. This movement helps the roast stay even.
- Step 4: You should carefully listen for the first and second cracks. Stop when the beans match the roast level you want.
- Step 5: Then pour the beans onto a baking tray or spread them over aluminum foil to cool down. You should stir them until they reach room temperature.
What Is the 15 15 15 Rule for Coffee?
The 15 15 15 rule for coffee is a simple and practical guideline for enjoying freshly roasted coffee at its best. It focuses on timing to preserve flavor, aroma, and smoothness. The rule is easy to remember and especially helpful for beginners who roast coffee at home.
This rule works in three steps; check them out below:
Step 1: Wait 15 Minutes After Roasting
Freshly roasted beans release gases, mainly carbon dioxide. Waiting for about 15 minutes lets these gases escape slightly. It is important because brewing too early can result in uneven extraction, bitter taste, or sharp flavors.
Step 2: Grind Within 15 Minutes
Grinding beans right after this short rest ensures maximum aroma and flavor. Once roasted, coffee begins to lose freshness quickly. Grinding at the right moment keeps the coffee oils intact, which directly affects the taste.
Step 3: Brew Within 15 Minutes of Grinding
After grinding, you should brew the coffee promptly. Coffee starts to oxidize after grinding, and waiting too long can make it taste flat or stale. Brewing within 15 minutes preserves the fresh flavors from the roast.
The 15-15-15 rule helps produce a cup that is smooth, balanced, and aromatic. It prevents bitterness, sourness, or a flat taste. Thus, it can give you a fresh and enjoyable coffee experience every time. For home roasters, this rule is an easy way to maximize the flavors from your hard work.
Tips for Better Home Roasting
Roasting coffee at home is exciting and lets you control flavor, freshness, and roast level. You must understand the chemistry of coffee roasting. Alongside, simple habits can make a big difference in taste.
Paying attention to heat control, batch size, and cooling methods ensures your coffee is rich, balanced, and aromatic. If you keep in mind each important coffee roasting fact, you’ll get a far better cup every time. Here are some practical tips for better home roasting.
Control the Heat Carefully
Maintaining a steady temperature is very important. If the heat is too high, beans can burn on the outside while staying raw inside. Too low heat, and they roast unevenly. For cast-iron skillet/stovetop roasting, medium heat is best.
In ovens or air fryers, preheat to the recommended temperatures. You should watch the beans closely and adjust the heat slightly if needed to achieve a consistent roast.
Roast in Small Batches
You should start with small amounts of beans, about one cup at a time. Small batches roast more evenly and are easier to manage. No matter if you use a skillet, oven, or air fryer, overcrowding slows the roast and can result in uneven coffee roasting stages. Also, it can leave some beans underdeveloped or burnt.
Listen for Cracks
Beans make audible pops during roasting called the first and second cracks. The first crack signals a light roast, while the second crack means a darker roast. Attention to these sounds helps achieve the exact roast you want and prevents over-roasting.
Cool the Beans Quickly
After roasting, you should pour the hot beans into a metal colander, a baking tray, or over aluminum foil. Stir or shake them until they reach room temperature. Quick cooling stops the roasting process and locks in flavor. Also, it prevents the roast from having bitter or burnt notes.
Store Properly
Store roasted beans in an airtight container away from light, heat, and moisture. You should avoid the fridge or direct sunlight. Proper storage keeps beans fresh longer and preserves the flavors you carefully developed during roasting.
Experiment and Take Notes
You should try different roast levels, batch sizes, and methods like popcorn popper method, oven roasting (450 to 500°F / 215°C), or air fryer roasting. Also, you can keep notes on what works best for you. Experiments can help you find your favorite roast and perfect the convenient way to roast coffee beans at home.
End Note
Home coffee roasting is both fun and rewarding. Knowledge of coffee roasting stages, proper heat control, and tips like the 15 15 15 rule lets you enjoy flavorful coffee anytime.
You can use a skillet, oven, air fryer, or popcorn popper. Roast small batches. Cool beans well. Try to time each step carefully for the best results.
So, you should experiment, take notes, and store beans correctly. With practice, you’ll discover the best way to roast coffee beans at home and enjoy the perfect cup every time.
FAQs
Can I roast coffee beans in a microwave?+
Yes, it is possible, but it's not ideal. Microwaves heat unevenly, which can lead to inconsistent roasting and burnt spots. Using a skillet, oven, air fryer, or popcorn popper gives better control and flavor.
How long does it take to roast coffee beans at home?+
Roasting time depends on the method and desired roast. On a stovetop or skillet, it usually takes 10 to 15 minutes. Oven roasting may take 12 to 20 minutes. Attention to the first and second cracks helps determine the perfect roast.
What equipment do I need for home coffee roasting?+
You can use simple kitchen tools like a cast-iron skillet, baking sheet, metal colander, oven, air fryer, or popcorn popper. For better results, a wooden spoon or spatula is helpful to stir beans evenly during roasting.
Leave a comment